## 1. Model Structure
YOLOv5 (v6.0/6.1) consists of:
- **Backbone**: `New CSP-Darknet53`
- **Neck**: `SPPF`, `New CSP-PAN`
- **Head**: `YOLOv3 Head`
Model structure (`yolov5l.yaml`):
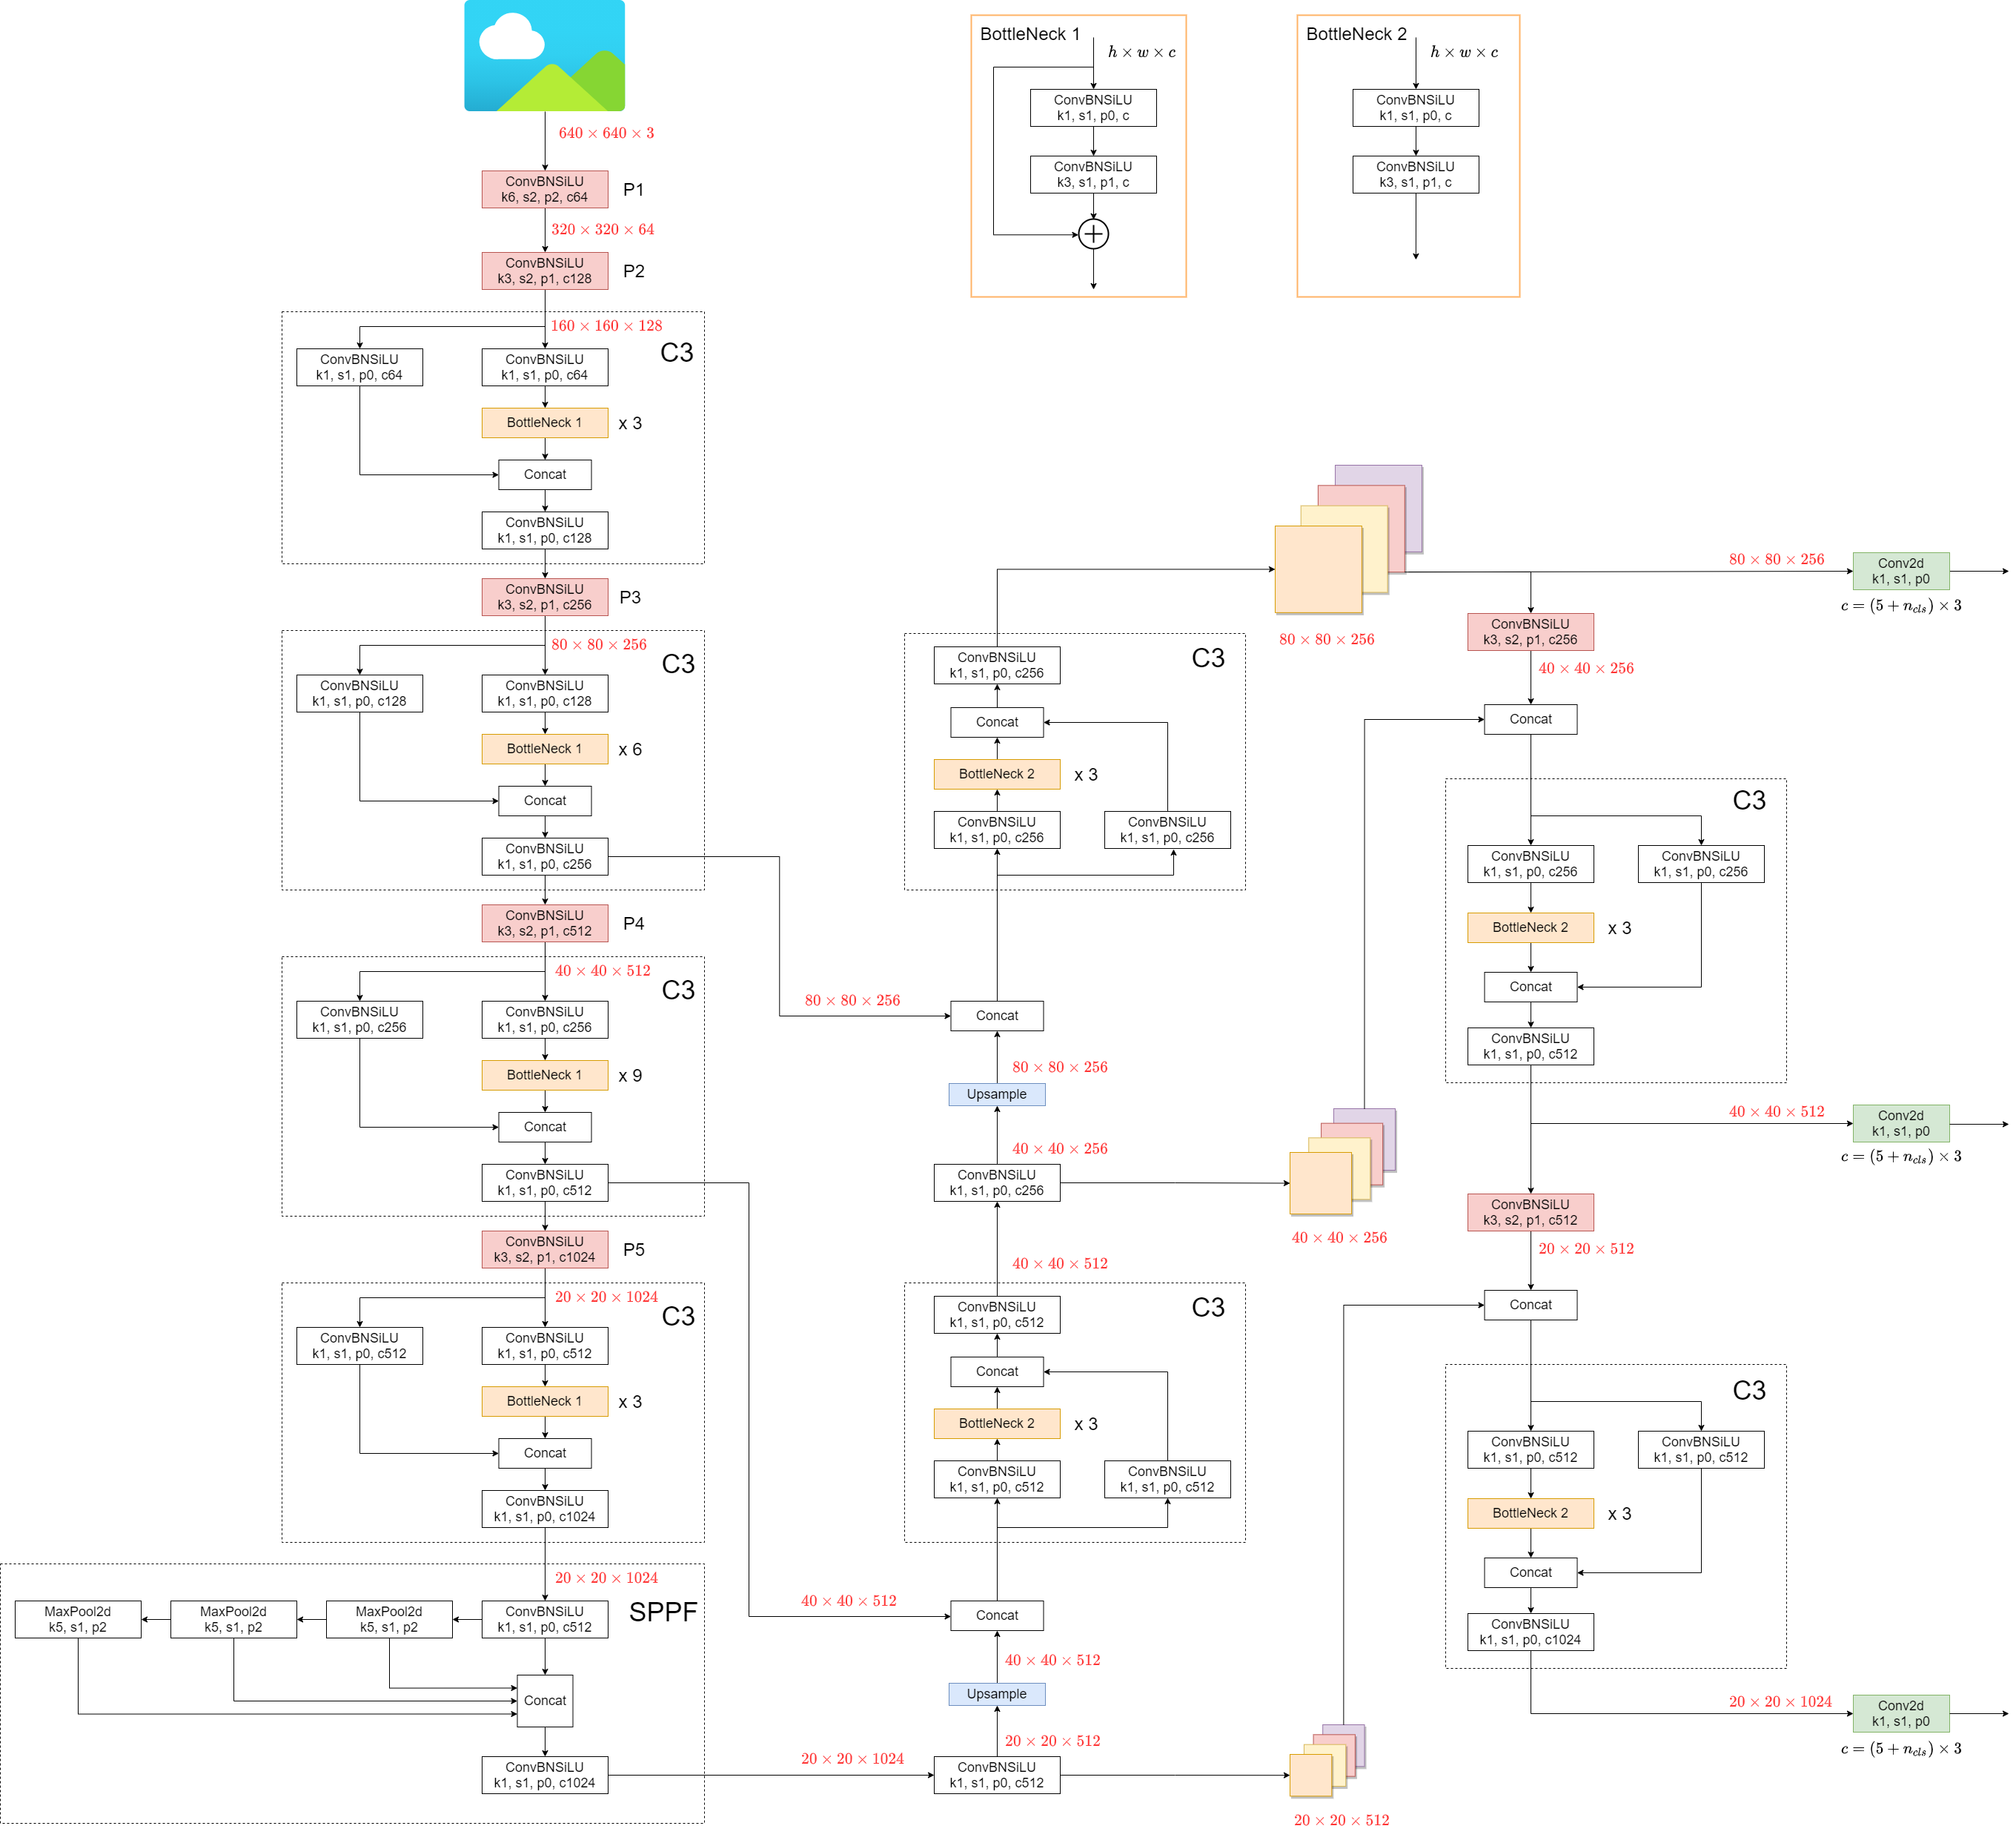
Some minor changes compared to previous versions:
1. Replace the `Focus` structure with `6x6 Conv2d`(more efficient, refer #4825)
2. Replace the `SPP` structure with `SPPF`(more than double the speed)
<details markdown>
<summary>test code</summary>
```python
import time
import torch
import torch.nn as nn
class SPP(nn.Module):
def __init__(self):
super().__init__()
self.maxpool1 = nn.MaxPool2d(5, 1, padding=2)
self.maxpool2 = nn.MaxPool2d(9, 1, padding=4)
self.maxpool3 = nn.MaxPool2d(13, 1, padding=6)
def forward(self, x):
o1 = self.maxpool1(x)
o2 = self.maxpool2(x)
o3 = self.maxpool3(x)
return torch.cat([x, o1, o2, o3], dim=1)
class SPPF(nn.Module):
def __init__(self):
super().__init__()
self.maxpool = nn.MaxPool2d(5, 1, padding=2)
def forward(self, x):
o1 = self.maxpool(x)
o2 = self.maxpool(o1)
o3 = self.maxpool(o2)
return torch.cat([x, o1, o2, o3], dim=1)
def main():
input_tensor = torch.rand(8, 32, 16, 16)
spp = SPP()
sppf = SPPF()
output1 = spp(input_tensor)
output2 = sppf(input_tensor)
print(torch.equal(output1, output2))
t_start = time.time()
for _ in range(100):
spp(input_tensor)
print(f"spp time: {time.time() - t_start}")
t_start = time.time()
for _ in range(100):
sppf(input_tensor)
print(f"sppf time: {time.time() - t_start}")
if __name__ == '__main__':
main()
```
result:
```
True
spp time: 0.5373051166534424
sppf time: 0.20780706405639648
```
</details>
## 2. Data Augmentation
- Mosaic
<img src="https://user-images.githubusercontent.com/31005897/159109235-c7aad8f2-1d4f-41f9-8d5f-b2fde6f2885e.png#pic_center" width=80%>
- Copy paste
<img src="https://user-images.githubusercontent.com/31005897/159116277-91b45033-6bec-4f82-afc4-41138866628e.png#pic_center" width=80%>
- Random affine(Rotation, Scale, Translation and Shear)
<img src="https://user-images.githubusercontent.com/31005897/159109326-45cd5acb-14fa-43e7-9235-0f21b0021c7d.png#pic_center" width=80%>
- MixUp
<img src="https://user-images.githubusercontent.com/31005897/159109361-3b24333b-f481-478b-ae00-df7838f0b5cd.png#pic_center" width=80%>
- Albumentations
- Augment HSV(Hue, Saturation, Value)
<img src="https://user-images.githubusercontent.com/31005897/159109407-83d100ba-1aba-4f4b-aa03-4f048f815981.png#pic_center" width=80%>
- Random horizontal flip
<img src="https://user-images.githubusercontent.com/31005897/159109429-0d44619a-a76a-49eb-bfc0-6709860c043e.png#pic_center" width=80%>
## 3. Training Strategies
- Multi-scale training(0.5~1.5x)
- AutoAnchor(For training custom data)
- Warmup and Cosine LR scheduler
- EMA(Exponential Moving Average)
- Mixed precision
- Evolve hyper-parameters
## 4. Others
### 4.1 Compute Losses
The YOLOv5 loss consists of three parts:
- Classes loss(BCE loss)
- Objectness loss(BCE loss)
- Location loss(CIoU loss)

### 4.2 Balance Losses
The objectness losses of the three prediction layers(`P3`, `P4`, `P5`) are weighted differently. The balance weights are `[4.0, 1.0, 0.4]` respectively.

### 4.3 Eliminate Grid Sensitivity
In YOLOv2 and YOLOv3, the formula for calculating the predicted target information is:
+c_x)
+c_y)


<img src="https://user-images.githubusercontent.com/31005897/158508027-8bf63c28-8290-467b-8a3e-4ad09235001a.png#pic_center" width=40%>
In YOLOv5, the formula is:
-0.5)+c_x)
-0.5)+c_y)
)^2)
)^2)
Compare the center point offset before and after scaling. The center point offset range is adjusted from (0, 1) to (-0.5, 1.5).
Therefore, offset can easily get 0 or 1.
<img src="https://user-images.githubusercontent.com/31005897/158508052-c24bc5e8-05c1-4154-ac97-2e1ec71f582e.png#pic_center" width=40%>
Compare the height and width scaling ratio(relative to anchor) before and after adjustment. The original yolo/darknet box equations have a serious flaw. Width and Height are completely unbounded as they are simply out=exp(in), which is dangerous, as it can lead to runaway gradients, instabilities, NaN losses and ultimately a complete loss of training. [refer this issue](https://github.com/ultralytics/yolov5/issues/471#issuecomment-662009779)
<img src="https://user-images.githubusercontent.com/31005897/158508089-5ac0c7a3-6358-44b7-863e-a6e45babb842.png#pic_center" width=40%>
### 4.4 Build Targets
Match positive samples:
- Calculate the aspect ratio of GT and Anchor Templates


)
)
)

<img src="https://user-images.githubusercontent.com/31005897/158508119-fbb2e483-7b8c-4975-8e1f-f510d367f8ff.png#pic_center" width=70%>
- Assign the successfully matched Anchor Templates to the corresponding cells
<img src="https://user-images.githubusercontent.com/31005897/158508771-b6e7cab4-8de6-47f9-9abf-cdf14c275dfe.png#pic_center" width=70%>
- Because the center point offset range is adjusted from (0, 1) to (-0.5, 1.5). GT Box can be assigned to more anchors.
<img src="https://user-images.githubusercontent.com/31005897/158508139-9db4e8c2-cf96-47e0-bc80-35d11512f296.png#pic_center" width=70%>
## Environments
YOLOv5 may be run in any of the following up-to-date verified environments (with all dependencies including [CUDA](https://developer.nvidia.com/cuda)/[CUDNN](https://developer.nvidia.com/cudnn), [Python](https://www.python.org/) and [PyTorch](https://pytorch.org/) preinstalled):
- **Notebooks** with free GPU: <a href="https://bit.ly/yolov5-paperspace-notebook"><img src="https://assets.paperspace.io/img/gradient-badge.svg" alt="Run on Gradient"></a> <a href="https://colab.research.google.com/github/ultralytics/yolov5/blob/master/tutorial.ipynb"><img src="https://colab.research.google.com/assets/colab-badge.svg" alt="Open In Colab"></a> <a href="https://www.kaggle.com/ultralytics/yolov5"><img src="https://kaggle.com/static/images/open-in-kaggle.svg" alt="Open In Kaggle"></a>
- **Google Cloud** Deep Learning VM. See [GCP Quickstart Guide](https://github.com/ultralytics/yolov5/wiki/GCP-Quickstart)
- **Amazon** Deep Learning AMI. See [AWS Quickstart Guide](https://github.com/ultralytics/yolov5/wiki/AWS-Quickstart)
- **Docker Image**. See [Docker Quickstart Guide](https://github.com/ultralytics/yolov5/wiki/Docker-Quickstart) <a href="https://hub.docker.com/r/ultralytics/yolov5"><img src="https://img.shields.io/docker/pulls/ultralytics/yolov5?logo=docker" alt="Docker Pulls"></a>
## Status
<a href="https://github.com/ultralytics/yolov5/actions/workflows/ci-testing.yml"><img src="https://github.com/ultralytics/yolov5/actions/workflows/ci-testing.yml/badge.svg" alt="YOLOv5 CI"></a>
If this badge is green, all [YOLOv5 GitHub Actions](https://github.com/ultralytics/yolov5/actions) Continuous Integration (CI) tests are currently passing. CI tests verify correct operation of YOLOv5 [training](https://github.com/ultralytics/yolov5/blob/master/train.py), [validation](https://github.com/ultralytics/yolov5/blob/master/val.py), [inference](https://github.com/ultralytics/yolov5/blob/master/detect.py), [export](https://github.com/ultralytics/yolov5/blob/master/export.py) and [benchmarks](https://github.com/ultralytics/yolov5/blob/master/benchmarks.py) on macOS, Windows, and Ubuntu every 24 hours and on every commit.